COMING SOON . . .

Friday, March 11, 2011

Sunday, March 6, 2011
+2.5ft tank - Day 65
 Quick left side shot. Glosso not as compact compare to the middle section due to light distribution but still acceptable.
Mini update:
Today added 1 pot of Cryptocoryne parva. Saw it at LFS many months ago. Feel pity for the plant so I decided to adopt it back. Separate out into smaller portion and treated with BW Growth to kill algae.
My method of killing algae on newly purchase plant since someone ask me as per below..better share it here so no need to pm.
1) I use 5ml of BW Growth with 5ml of filtered water (1:1)
2) Separate plant into smaller portion and wash it under running water.
3) I use my hand to gently rub off visible algae and dirt. Please do it with extra care because plant is very fragile.
4) Soak the plant in the solution for ~10mins.
5) Rinse the plant with running water again.
6) Plant is ready for planting.
Note - this is not a proven method. Will provide update after a week. For reference, the plant is covered with quite a lot of hair algae.
Boraras Maculatus


 Suitable little fishes for small tank. I am having 15 of this on top of 20 Ember tetra. Occasionally they shoal together with Ember tetra.
Saturday, February 26, 2011
BorneoWild Fish Food
Gotten 2 new fish food for my recent acquired Ember tetras.
 BorneoWild Staple S. Fine granulates for baby fishes.
 BorneoWild Pro Color. Hopefully I can boost my ember color to dark shade of orange/red.
Monday, February 21, 2011
How to clean lilypipe?
Checklist:
1) Bleach (I use Clorox)
2) Bucket
3) Clean water
4) Spring washer (I use ADA Spring Washer)
Steps:
1) Prepare 3 parts of bleach to 1 part of clean water (3:1) in a bucket.
2) Soak glassware (lilypipe) in the bleach solution for about 1 to 2 hours. Soak longer if need to.
3) Remove the glassware and rinse with clean water.
4) Use spring washer to clean stubborn stain/slime/algae if required.
 Effortless cleaning....Sparkling glassware..
1) Bleach (I use Clorox)
2) Bucket
3) Clean water
4) Spring washer (I use ADA Spring Washer)
Steps:
1) Prepare 3 parts of bleach to 1 part of clean water (3:1) in a bucket.
2) Soak glassware (lilypipe) in the bleach solution for about 1 to 2 hours. Soak longer if need to.
3) Remove the glassware and rinse with clean water.
4) Use spring washer to clean stubborn stain/slime/algae if required.
 Effortless cleaning....Sparkling glassware..
Sunday, February 20, 2011
GUSH oBubble Mini
 Replace my Cal Aqua Lab nano lilypipe with GUSH oBubble pipe.
 Shot from other angle
 Another shot...
 Water is added until the "bubble" head is fully submerged.
 Close up shot. I like the wave effect. Co2 diffuser is placed below the output to test the vortex effect. The result is fine co2 bubble got suck into the "bubble" head and circulate inside before being push out again. I am not exactly sure if this will cause co2 loss but further monitoring will be done from tomorrow onwards.
Saturday, February 19, 2011
D-D RO Unit + Crystal Pro DI Resin Unit
 Unpacking D-D RO filter. Does not come with DI Resin filter (Separate purchase).
 Complete accessories provided. Hose are differentiated by 3 colors (white, blue and orange). Small details from D-D product for easy identifying of input/output.
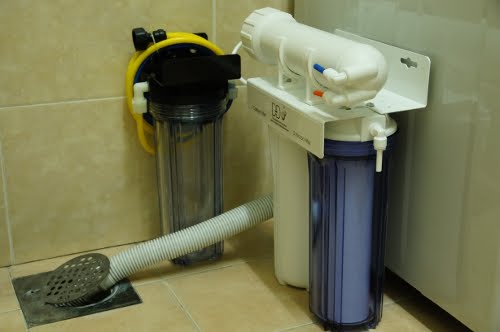 I do not want to drill the RO unit to the wall. Proposed spot....
 All the connections are hooked up for test run. White hose - connected to main water source, orange hose - waste water after filtering, blue hose #1 - output from RO unit to DI unit, blue hose #2 - output from DI unit (clean RO water). TDS meter is connected in between the white hose and blue hose #2 to test water parameter before/after filtering. Filter health check will be kept in optimum condition with this equipment.
 Test run...bucket is intentionally placed on top of washing machine to test the output since filter is placed on the floor.
 Need to wait approx 15 mins to see water flowing out from blue hose. Messy hose will be tied with zip cable later.
Result: Passed!

 Final position.
Now I need to source for 2 big water containers, to store RO water and mixing container.
Subscribe to:
Posts (Atom)